
Building a Reusable WebGPU & Rust Engine: Part 2 — Loading Custom Geometry & WGSL Shaders
In Part 1, we talked about the CPU event loop and established our foundational wgpu state. Now, we expand our engine to load 3D geometry (.obj files) from disk and feed it through a custom WGSL Shader Pipeline.
old-post link
Writing WGSL Shaders
Shaders are the small, highly parallel programs that run directly on the GPU to render 3D geometry and color pixels.
In wgpu, we primarily work with two types of shaders:
Vertex Shader (@vertex): Processes incoming vertex positions and attributes. Its primary job is converting 3D coordinates into Clip Space coordinates.(homogenous coordinates used by the GPU rasterizer)
Fragment Shader (@fragment): Runs once for every pixel (or fragment) covered by a primitive (like a triangle) to determine its output color.
We will go back to this part in short furture! it’s very useful process.
(Note: traditional APIs had geometry shaders, WebGPU omits them to ensure consistent cross-platform performance.)
When loading external 3D models (like an .obj file), here I pass three core vertex attributes to the vertex shader:
Position: The 3D spatial coordinates [x, y, z].
Texture Coordinates (UV): Mappings used to align 2D textures onto 3D surfaces.
Normals: Surface direction vectors, essential for calculating real-time lighting in the fragment shader.
Preparing Memory Layouts & CPU-to-GPU Buffers
To pass .obj model data from the CPU to GPU memory, we establish two key data structures:
1, Vertex custom data struct (wgpu::VertexBufferLayout & wgpu::VertexAttribute):
position — [f32; 3]tex_coords — [f32; 2]normal — [f32; 3]
Defines how memory is ordered inside the vertex buffer. Using wgpu::VertexAttribute, we specify memory offsets for each field (Position, UV, Normal) so the GPU knows exactly where each attribute begins in raw binary data.
2, Mesh custom data struct (CPU Side):
Once the .obj file is loaded into your Vertex structs, you upload them to the GPU. You create a Mesh struct to hold onto those GPU handles:
Vertex Buffer: Stores the array of packed vertex data.
Index Buffer: Stores the vertex indices, allowing triangles to reuse shared vertices to save GPU memory.
Index Count (indices.len()): Tracks the total element count required by render_pass.draw_indexed().
3. Connecting Everything in the Render Pipeline
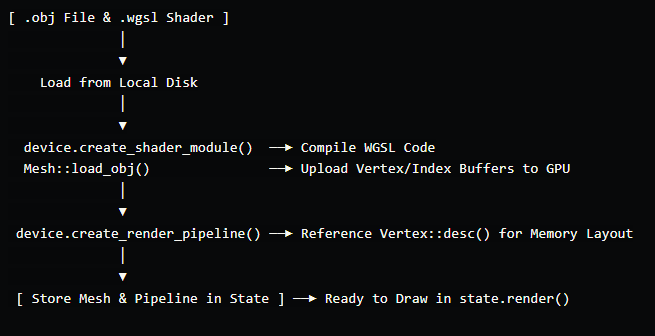
Load Assets: Read the .obj file into a Mesh struct and compile the WGSL shader code using device.create_shader_module().
Build the
RenderPipeline: Create the pipeline viadevice.create_render_pipeline(), setting the@vertexand@fragmententry points. Pass descriptionVertex::desc()into the pipeline setup sowgpu render_pipelineknows how to map the vertex buffer straight into shader inputs.Execute during Render: Store both the
RenderPipelineand Mesh inside your State. Insiderender()loop, bind the pipeline and draw the mesh buffers
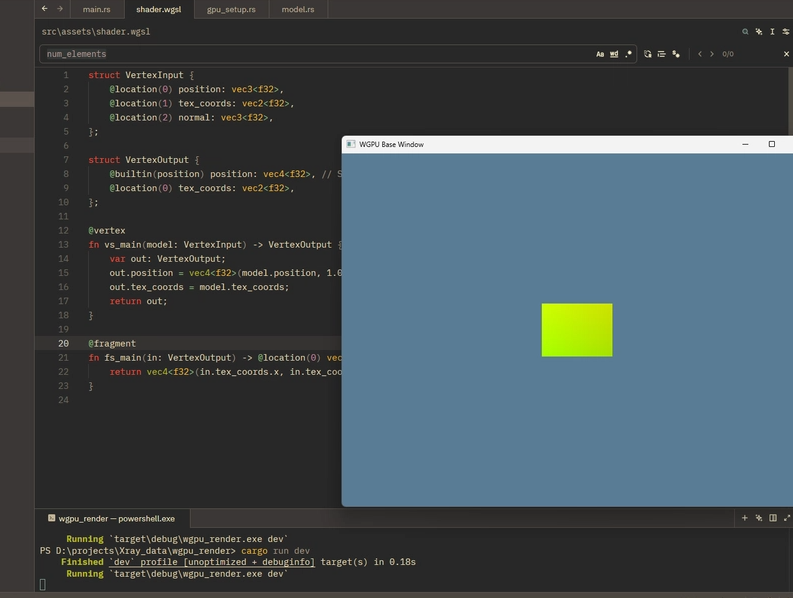
Just like in Part 1, in the end the exciting result: we can load a 3D box into the scene using our custom shader—even without setting up a camera yet!
--------------------------------------------------------------------------------
Thanks for reading, here is my Industrial Rust Projects:
Building industrial 3D vision or AI pipelines? Check out ForgeOptics on Gumroad for high-performance Rust ray-tracing, physical sensor noise, and synthetic dataset generation.